RyonaRPG → Locations → Undersea Temple
|
Core version: 155 (2022-08-10)
Gameplay: Technical help: External links: |
Contents
General Information
- Unlocking
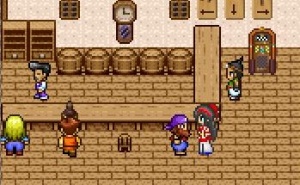
- In the Ray-On Village pub, talk to the pirate guy with a purple bandanna to purchase info from him (pick the first option). Then when presented with four choices, pick the second option which costs 100 gold.
- Difficulty
- 2 stars
- General Notes
- Many enemies in this dungeon take extra damage from lightning magic/attacks.
- Bleeding is a very common condition in this dungeon, inflicted by the Invisible Blade trap.
- While walking in and under water, your character will move much slower; Swimsuit-type armors will restore movement speed in shallow water.
- While underwater your character cannot use magic and will slowly lose Health. Equipped lighting attribute equipment will periodically zap you, dealing damage.
- If you are blinded while underwater the blindness might not end until you leave the water.
- This dungeon has quite a number of chests giving random equipment. Most of these will respawn with new items if you exit the dungeon and come back again.
Floor 1
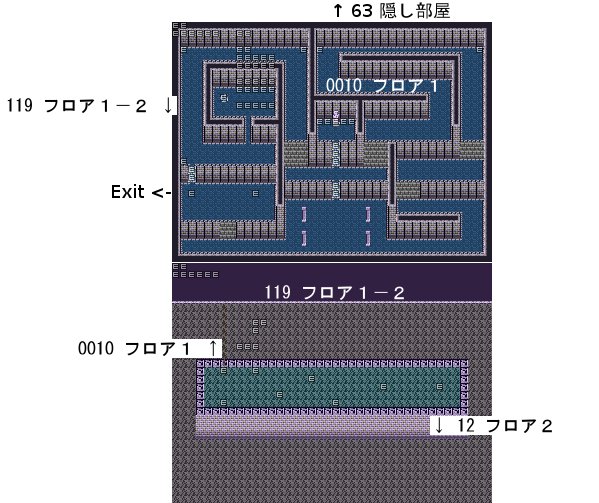
Floor 1 is fairly straightforward. Right by the entrance is a healing fairy. Entering the whirlpool to the northwest takes you to the next floor (Map 119). A statue in the first area will teleport you to Map 63, but you won't be able to do anything there until after you defeated the boss.
The second area of Floor 1 is underwater. You can climb up the rope back to the previous area if the enemy spawn looks bad. Walk all the way to the right and there will be a trap-looking hatch on the floor. Attack it a few times to reveal the stairway to Floor 2; it is resistant to most forms of damage but vulnerable to blunt attacks such as from a mace or staff.
Floor 2
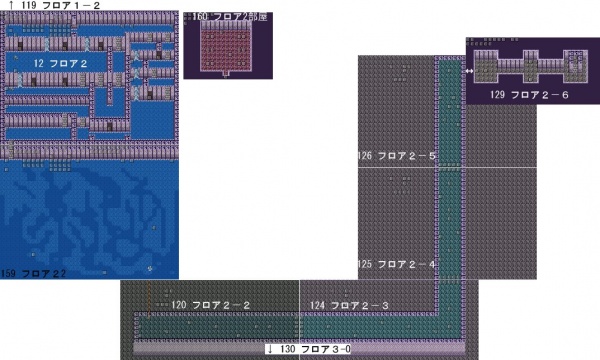
The first area on this floor (Map 12, フロア2) has only one chest that does not explode. To get to it head all the way to the right, take the second-to-last stairs and go down two waterfalls. The chest you want is the second chest after the second waterfall. All doors in this area lead to a room (Map 160) with six mummies that must all be defeated to leave the room. Be careful when wielding the Master Blade while opening any of these doors as the game may bug out and make you unable to attack or access the menu. The mummy room accessed from the southernmost door of this area has a Light Guard (ライトガード) shield. The sarcophagus in the mummy rooms can be searched for items, most notably the Goat Plushie and Death Masquerade.
The second area of Floor 2 (Map 159, フロア22) is a large pool of water, and you can only move on the shallow parts. On the middle right side is an Element Robe, while a purple chest at the bottom center contains a Golden Armor. The bones on the lower left has an Ether and a good amount (512~3120) of gold. Walk into the whirlpool in the lower right to enter the next area, which is underwater.
In the lower left corner of the third area (Map 120, フロア2-2) there is a Soul Jar 4. The hatch in the right side of this area leads to Floor 3, although you can continue to the right to explore further.
In Map 125 (フロア2-4) you can pick up a special Crystal (not the Crystal Fragments used to learn skills) that will come in handy later in this dungeon. In Map 126 (フロア2-5) there is a Soul Jar 4 on the floor, and a hatch that leads to a dry area.
In Map 129 (フロア2-6), to the far right is a chest that contains the Bubble Cloth (泡の衣) armor which removes all penalties when you are underwater or walking in water. However, as soon as you open that chest two Phantom Armors will appear. They are resistant to most bladed weapons, but are weak against weapons such as the Morning Star and Mace. It is possible to run past them and escape.
Floor 3
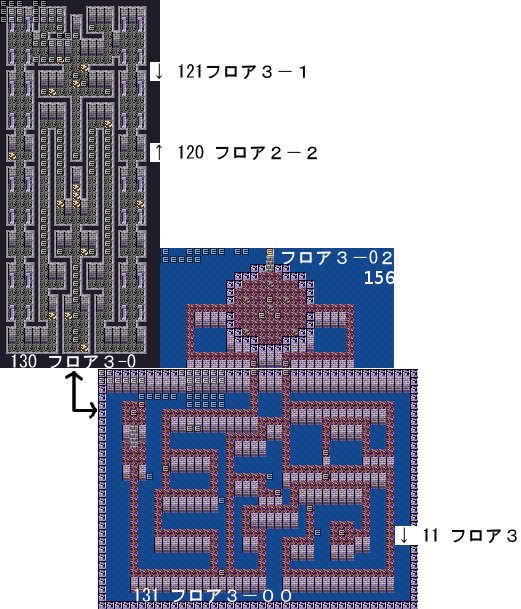
The first area of Floor 3 (Map 130, フロア3-0) has stretches of floor tiles with active spikes. There is also a Phantom Armor guarding each of the two staircases. However, if you picked up the Crystal in Map 125 earlier, the Phantom Armors and spike tiles will all be disabled although there will still be random traps. Additionally, just north of the entry stairway is a small sigil on the floor. If you have the Crystal, it will teleport you to Map 121 (フロア3-1), skipping two maps (skip the next paragraph if you are teleporting). While most of the chests on this floor are empty, the two near the downward staircase are not.
Downstairs from Map 130 is Map 131 (フロア3-00). This map is actually split in two due to a chest blocking the way, and to get to the right side you need to pass through Map 156 (フロア3-02) to the north. In Map 156 there are rapidly moving Dancing Swords that can deal a notable amount of damage and knock you down. The swords may be deactivated by going to the northernmost point and interacting with the crystal ball there; there is a 1/3 chance of obtaining the Warrior's Spirit (戦士の魂, a left hand equipment that increases critical hit chance).
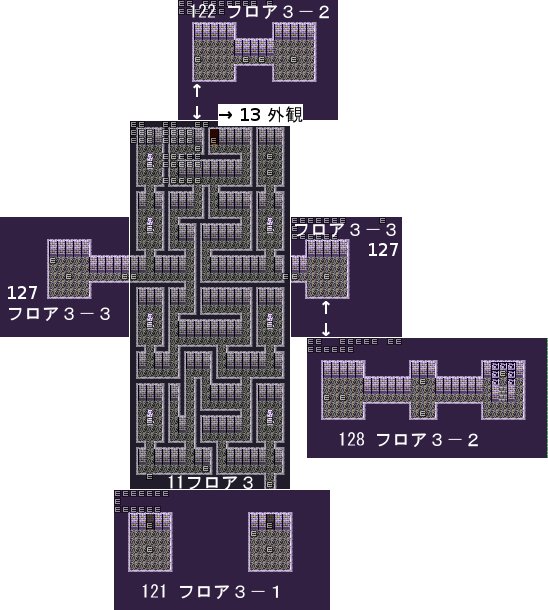
The eastern half of Map 130 leads down to Map 11 (フロア3). Map 11 is notable in that it has the rare Delta Horse trap. A number of statues can also be found in this area which gives you some astrological clues needed for a later part of the dungeon.
To the right of the stairs is an exit to the south that leads to the eastern room of Map 121 (フロア3-1) which is the destination of the crystal teleporter. If you step on the sigil again with the Crystal in your possession you'll be teleported out of the dungeon. Another door is in the passage to the left of the stairs which leads to the western room of Map 121. In that room is a ヤドガココニアール, a single-use consumable that lets you rest anywhere by paying the regular inn price.
Midway up Map 11 (フロア3) to the west is a path leading to a chamber in Map 127 (フロア3-3), which has a chest containing a Potion (the chest doesn't appear at night). On the opposite side of the same path in Map 11 is a secret door leading to another chamber in Map 127, with stairs leading down into Map 128 (フロア3-2). Map 128's layout similar to Map 129 (フロア2-6), and if you open the chest two Phantom Armors will appear. (Note that there is a chance a trap may spawn under the stairs, making it impossible to leave the room.) The chest randomly gives you one of the following:
- Defender (ディフェンダー)
- Ice Sword (アイスソード)
- Ice Shield (アイスシールド)
- Water Raiment (水の羽衣)
- Mace (AD) (メイス(AD))
- Energy Saber (エネルギーセイバー)
- Shuriken (しゅりけん)
- X Potion (エクスポーション)
To the northeast of Map 11, east of the exit is a secret staircase leading to Map 122 (フロア3-2). The chest there randomly gives you one of the following:
- WereBuster (ウェアバスター; does extra damage against Werewolves)
- Lightning Rod Blade (避雷針ブレード)
- Trident (トライデント)
- Force Buckler (フォースバックラー)
- Ether
- Ether Dry
- Hi-Potion
- Long Spear (ロングスピア)
To solve the giant clock puzzle, you have to interact with the raised squares and enter the correct astrological signs as hinted by the statues on the level. The correct sequence, clockwise, is ♐, ♑, ♉, ♓, ♊, ♒, ♋, ♎, ♏, ♍, and ♌. This unlocks the door to the right that leads to the chamber with four chests. Note that the map below does not account for this puzzle.
Each of the chests has its own unique loot table. Of note are the contents of the bottom right chest which yields consumables that increase one of your attributes permanently. Possible items are as listed below:
- Bottom Left - High Potion, Elixir, X Potion, Dry Ether, Super Ether, Ether
- Bottom Right - Nipple Gum, Magic Source, High Demon's Fluids, Octopus Dumpings, Body Enhancer
- Upper Left - Child's Shoes, Fairy Wing, Incandescent Bracelet, Ocean Augite, Angel's White Robe, Ruby Sandals, Elvish Cloak, Black Box
- Upper Right - Silver Dagger, Silver Foil (dagger), Holy Knife, Holy Ring, 30 Holy Arrows
Exterior
This exterior section connects the two sides of the temple, particularly Floors 4 and 6. To the north is a Crystal Fragment on a ledge which you will be able to collect much later, although you will need to go through Floors 4 to 6 again when you do.
Once you get past Floor 6 you will be able to ascend to the highest level of the temple. There will be two waterfalls; interact with the first to access a hidden room, and the second to drop to the Sea God's Residence.
The hidden room has three main chambers: the left one leads to an octopus boss that counts for the purposes of the Boss Subjugation counter, the middle contains two magic pools that restore Mana, and the one on the right leads to a statue that teleports you to its pair in Floor 1, allowing you to access two chests containing a Prime Blue and Soul Jar 8.
The octopus boss consists of its head and several tentacles that move independently of it. Once sufficiently damaged it will trigger a powerful attack that massively damages you and causes any previously killed tentacles to respawn. Upon defeat the boss drops a random item and a fairy appears that will take you back.
Floor 4
This area consists of sections of water with electric rod traps that randomly appear in intervals, dealing lightning damage and which may inflict Paralysis unless you wear the Insulator Armor (絶縁体アーマー). Alternatively you may also wear the Bubble Suit to move through the area, stopping on dry land as necessary.
From the entrance, the second area via the northern exit has chests containing a large amount of gold and the Insulator Armor. The stairs to the west leads down to a large looping underwater section where you can find the following items:
- 10,000 gold
- Sea Cactus
- Soul Jar 16
- Berserk (Large Sword)
Crossing the first watery section in the first area takes you to the opposite side of the temple. Upstairs the next room has a Hisohi Grass, Mithril Bow, and lastly the Key to the Love Nest usable in Ray-On Village's item shop.
Floor 5
This short looping area will lock you in initially. The chests are blocked by statues and there will be no exit until you defeat the two mages that teleport around the area. You will have to defeat them again whenever you enter this floor.
The western chest may yield the following:
- Snake Skin Leotard (Immunity to Poison)
- Shadow Veil
- Super Ether
- Bat Coat
- Force Shield
- Force Buckler
- Dark Necklace (Immunity against Darkness)
- Scarlet Robe
- Moon White Shawl (Cold Resistance)
- Silk Robe
- Mithril Robe
- Just A Piece of Cloth
- Water Raiment
The eastern chest may yield the following:
- Soul Staff (+50 Health)
- Rod of Flame (Fire Amplification and Resistance)
- X Potion
- Rod of Ice (Ice Amplification and Resistance)
- Sorcerous Staff (Doubles Magic Damage and MP consumption)
- Rod of Thunder (Thunder Amplification and Resistance)
- Detonation Club (Hammer)
- Rune Staff (Consumes MP to critical hit)
- Child's Shoes
- Mithril Rod
Floor 6
This area also has a watery section, but does not have any electric rod traps. Instead, several moving saws crisscross the area, including two that will chase you. Items of note in this area are the Damascus Sword, Soul Jar 4, and Civilian. The chest in the northwest contains a random item which may also include the Sword of Damocles, a relatively powerful Large Sword.
Sea God's Residence
- The boss is at the lowest level of the map; to reach him you need lower the water level.
- There are three iron maidens that will each ask you a question that has to be answered in two minutes. The correct answer makes the water level fall while the wrong answer will trigger a unique game over. Hints may be gathered from the statues in Map 11 and from the "love nest" in the Ray-On Village item shop.
- After the first iron maiden you can access a chest containing the useful Chain Flail.
- The questions and answers are as follows (V-MAX mode):
- Question 1: What is in the northeast? ("Sacrifice", Capricorn)
- Question 2: What is the exact opposite of "the Beast with Horns?" ("Poison", Scorpio)
- Question 3: What forms an equilateral triangle with "Poison" and "Hunter"? ("Mirror Match", Gemini)
- For reference, the astrological signs are as follows (counterclockwise) according to their positions on a clock:
- 12. ♐ – Sagittarius [Hunter]; 11. ♈ – Aries [The Irrefutable]; 10. ♌ – Leo [Beast]; 9. ♍ – Virgo [Maiden]; 8. ♏ – Scorpio [Poison]; 7. ♎ – Libra [Justice]; 6. ♋ – Cancer [Hard Back]; 5. ♒ – Aquarius [Water]; 4. ♊ – Gemini [Mirror Match]; 3. ♓ – Pisces [Swimming Thing]; 2. ♉ – Taurus [Horned Creature]; 1. ♑ – Capricorn [Sacrifice]
- Once you have answered two of the three iron maidens, avoid being in the water while at very low health; there is a chance (marked by random water spouts) that the Sea God may grab and incapacitate you, necessitating a rescue from other characters.
Sea God
- The Sea God is a jellyfish with two offensive tentacles. It will move from top to bottom on the left side of the arena while striking at you with those tentacles.
- Periodically the tentacles will draw back and slam down on you for massive damage.
- The Sea God will also spit out balls of lightning in intervals that follow a random pattern. He can also rarely Freeze you, which may be dangerous if he follows up with a slam.
- Quite rarely it will use the same wave attack as the earlier octopus boss which greatly reduces your health; be careful if this happens when the eyes on his tentacles are open.
- When the eyes are open the Sea God will attempt to grab you if possible, draining your Health (while healing him) and increasing your EX gauge. (Note that it was also observed that this may also drain levels from your character and grant it to him; a test with the invulnerability option had him eventually doing 9999 damage to a character drained to level 1.)
- The Sea God is vulnerable against the Trident (トライデント) and lightning magic.
- On death he drops a random item which may include the Moonstone and Thunder Squid's Tentacle.
- After the fight a fairy will appear that may be used to leave the dungeon. There will also be a chest containing one of the following:
- Protecting Ring (Creates a protective physical barrier reliant on Magic)
- Malachite Ring (Absorbs Fire but has a drawback)
- Star Bringer (Holy attribute Dagger)
- Mellow Ring (Water Resistance)
- Urishu's Knife (Large Axe)
- Sapphire Ring (20% chance of avoiding Fire, Ice, and Lightning attribute attacks)
- Psycho Ring (+60 Willpower)
- Registry Ring (Creates a protective magical barrier reliant on Magic)
