Difference between revisions of "Premium Play Darkness/Studio"
| Line 60: | Line 60: | ||
==Funtions explained== | ==Funtions explained== | ||
===Character Control (Tab 1 2 3)=== | ===Character Control (Tab 1 2 3)=== | ||
| − | ===First Tab=== | + | ====First Tab==== |
[[File:Tut_1.png|thumb]] | [[File:Tut_1.png|thumb]] | ||
1) | 1) | ||
| Line 122: | Line 122: | ||
Reset the animation timing for all selected character. Useful if you want 2 characters' movements to synchronizing. | Reset the animation timing for all selected character. Useful if you want 2 characters' movements to synchronizing. | ||
| − | ===Second Tab=== | + | ====Second Tab==== |
[[File:Tut_2.png|thumb]] | [[File:Tut_2.png|thumb]] | ||
1) | 1) | ||
| Line 184: | Line 184: | ||
20) | 20) | ||
Toggle Visibility, Shadow, Penis (only used for male characters). | Toggle Visibility, Shadow, Penis (only used for male characters). | ||
| − | ===Third Tab=== | + | |
| + | ====Third Tab==== | ||
[[File:Tut_3.png|thumb]] | [[File:Tut_3.png|thumb]] | ||
1) | 1) | ||
| Line 217: | Line 218: | ||
===Maps & Items System (Tab 4 5)=== | ===Maps & Items System (Tab 4 5)=== | ||
| − | ===Fourth Tab=== | + | ====Fourth Tab==== |
[[File:Tut_4.png|thumb]] | [[File:Tut_4.png|thumb]] | ||
1) Select a background scene and apply. | 1) Select a background scene and apply. | ||
| Line 233: | Line 234: | ||
7) Show xyz cordination arrows, useful to check which direction x and z go. | 7) Show xyz cordination arrows, useful to check which direction x and z go. | ||
| − | ===Fifth Tab=== | + | ====Fifth Tab==== |
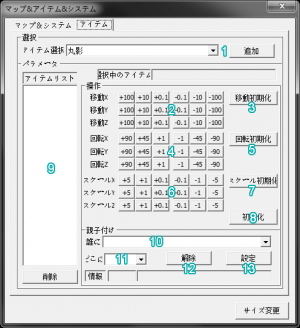
[[File:Tut_5.png|thumb]] | [[File:Tut_5.png|thumb]] | ||
1) Select object and load. | 1) Select object and load. | ||
Revision as of 06:44, 30 January 2013
Contents
What is it?
Premium Play Darkness Studio is a poser application released as a free DLC by Illusion for use with Premium Play Darkness.
Mouse and Keyboard
- Leftclick drag + Num 8462 = Rotate
- Rightclick drag Right+Left / Mousewheel / Home&End / ö&¨ = Zoom
- Rightclick drag Up+Down / PageUp&PageDown = Camera Up&Down
- Middleclick drag = Pan
- Left+Rightclick drag = Move center point in scene
- CTRL Click = Move active character
- CTRL Rightclick = Rotate active character
- 1 = Hide Character Control
- 2 = Hide Maps & Items System
- F11 = Take screenshot (in \data\cap)
- R = Reset Camera
- T = Rotate Camera (continous)
- ' = Tilt right
- . = Tilt left
- - = Tilt reset
On selected character
- Q = Center camera on head
- W = Center camera on chest
- E = Center camera on crotch area
- U = Toggle shadow
- Y = Toggle pubic hair (if the character has any when she was created)
- A = Cycle eye direction
- S = Cycle neck
- D = Cycle eyebrow
- F = Cycle eyeshape
- G = Cycle mouth
- H = Toggle blindfold
- J = Toggle gag
- K = Toggle tears
- L = Cycle blush
- Z = Cycle nudity
- X = Cycle bra
- C = Cycle pants
- V = Cycle cum in face
- B = Cycle cum on chest
- N = Cycle cum on belly
- M = Cycle cum on back
- ':' = Cycle cum on ass
- P = Freeze/Unfreeze the whole scene
Unused keys:
- IO
- Ä
- 3-0 & +´
- F1-F10 & F12
Funtions explained
Character Control (Tab 1 2 3)
First Tab
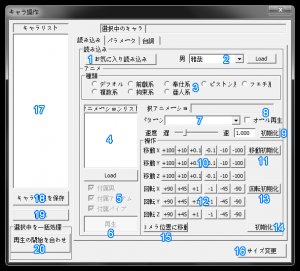
1) Click this button to load a female character of your choice into the scene
2) Load any male character or monster into the scene.
3) All poses and animations are here put into 8 groups.
4) Once you pick a group from 3), a list of poses will appear here. Double click or use the load button below to choose one.
5) Some poses include males or objects such as dildo or ropes. Use these 3 options to decide whether they should be visible.
6) If unchecked, the character will freeze. Can be used to pick a single frame from the movement.
7) Once you choose a pose or a sex position, a list of all possibly animation will appear here.
8) If checked, the character will go through every single animation that is listed in 7) and repeat itself infinitely.
9) Return the animation speed back to default, if the speed was changed.
10) Move the selected charachter.
11) Return selected characher back to default xyz cordination.
12) Rotate the selected character.
13) Return selected charachter back to default angle.
14) = 11) + 13)
15) Move the selected character to the centre of the camera, and face to the camera direction.
16) Minimize this window.
17) Characters in the scene will be listed here.
18) If you load a scene made by others and would like to save a certain female to your own game, use this.
19) Delete the selected character from the scene.
20) Reset the animation timing for all selected character. Useful if you want 2 characters' movements to synchronizing.
Second Tab
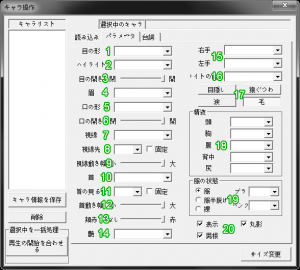
1) Shape of the eyes. (Happy, angry, ... etc.)
2) Iris.
3) How wide are the eyes opened.
4) Eyebrow. Same as 1).
5) Shape of Mouth. (Smiling, biting teeth, tongue out, ... etc.)
6) How wide the mouth is opened.
7) Gaze: Follow the camera, avoid camera ... etc.
8) Gaze direction: long, short, up, down, left, right, upper left ... etc. Check to lock.
9) How far can the gaze go. The smaller it is, the less the character can move her eyes.
10) Head, controls the neck, same as 7), can follow camera or avoid camera.
11) Works the same as 8).
12) The same as 9).
13) Blushed cheeks.
14) Body glow.
15) Right and left hand.
16) The angle which the light is coming from.
17) Toggle blindfold, ballgag, tears and pubic hair (if the character has pubic hair).
18) Semen on different body parts: head, breasts, belly, back, ass.
19) Outfit: Fully dressed, partially stripped or naked. +2 options for bra and panty.
20) Toggle Visibility, Shadow, Penis (only used for male characters).
Third Tab
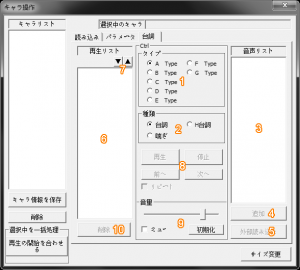
1) Select character and then pick one of the eight voice types.
2) All lines are divided into 3 groups: Normal lines (lines from story mode), H lines (Dirty talks), moaning/heavy breathing.
3) Once you picked a group in 2), all line will appear here. Double click or click 4) to bring the chosen line to 6)
4) see 3)
5) Import WAV files
6) Lines you picked will appear here.
7) Bring the lines into desired order.
8) Start playing, Stop, Previous line, Next line. Check to toggle repeat.
9) Volume. Check to mute, click to set volume back to default.
10) Delete the selected line.
Maps & Items System (Tab 4 5)
Fourth Tab
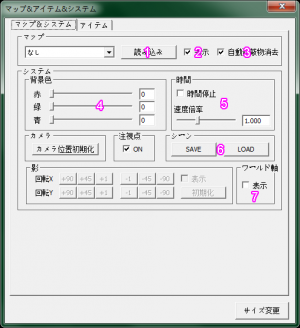
1) Select a background scene and apply.
2) Toggle visibility.
3) Toggle if objects automatically disappear if they block camera's view.
4) Background color
5) Freeze the whole scene, or adjust speed.
6) SAVE and LOAD scenes as png files.
7) Show xyz cordination arrows, useful to check which direction x and z go.
Fifth Tab
1) Select object and load.
2) Move the selected object.
3) Default for 2).
4) Rotate the selected object.
5) Default for 4)
6) Stretch the selected object.
7) Default for 6)
8) = 3) + 5) + 7)
9) Objects loaded will appear here.
10) Select character you want the object to stick to.
11) Select body part.
12) Deactivate
13) Apply setting. Click 8) to see the true result.
