Difference between revisions of "Custom Order Maid 3D2/Technical Help"
m (→Running the game) |
(Q4 in running the game add new files for lock skills) |
||
| Line 31: | Line 31: | ||
# AtlasSceneEdit.png | # AtlasSceneEdit.png | ||
# AtlasYotogi2.png | # AtlasYotogi2.png | ||
| + | # AtlasSkillSelect.png | ||
==Gameplay== | ==Gameplay== | ||
Revision as of 04:33, 22 July 2018
- Recent changes
- All pages
- Wiki tutorial
- Purge (this page)
all characters are at least 18
- FAQ & Technical Help
Contents
FAQ
Running the game
- Q1: I keep getting an "(0) Yotogi.Category enum parse error (non-Japanese text)" error when I run the game and I have AppLocale?
- A: If you receive an error called "(0) Yotogi.Category enum parse error (non-japanese text)", then that means your computer has not completely changed the system locale to Japanese because AppLocale doesn't support x64/64-bit OS. You must do the following below (choose one method only).
- For the x64/64-bit version without setting Windows system locale to Japanese, you can use NTLEA x64 and configure it like here. Next, press the arrow on the bottom right and that makes it so you can right click
COM3D2x64.exeto run the game with NTLEA x64. - Setting Windows system locale to Japanese, follow the intructions below (note: This method is recommended because it's simple, doesn't require NTLEA x64 and works fine on Windows 10).
Control Panel > Region > Administrative Tab > Language for non-Unicode programs chooseJapanese(Japan)and restart your computer.
- Q2: How to fix the translated UI that doesn't display correctly or has incorrect positioning after updating to ver1.09 or higher?
- A: You need to update YATranslator Plugin and Translation files because the old plugin version does not support the newer game version.
- Update the plugin to the latest version here YATranslator Plugin.
- Also update the following translation strings, texture and asset files from Sybaris2 AIO in
COM3D2\Sybaris\Unityinjector\Config - Delete the AtlasSceneTitle.png file in
COM3D2\Sybaris\Unityinjector\Config\Assets\resources - Replace it with the new AtlasSceneTitle.png which can be found here and edit the file name from
AtlasSceneTitle.png➡AtlasSceneDaily.pngin the resources folder.
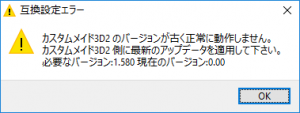
- Q3: I get an error when opening the COM3D2 launcher after updating to ver1.11 or higher and my current CM3D2 version is ver1.58.1, how to fix this problem?
- A: This issue is caused when the CM3D2 launcher doesn't match the current game version. You can fix this by doing the following.
- Update CM3D2 to the latest version.
- Go to the updater and copy
Update.lstthen replace the file in the CM3D2 game folder.C:\cm3d2_up160_x64_sub➡C:\KISS\CM3D2
Caution: Please backup Update.lst before replacing - Open the CM3D2 launcher and check the version shown in the launcher. If the version matches with the current game version then it's fixed.
- Q4: How to fix the translated UI or White UI after updating to ver1.17 or higher?
- A: Delete the following translated UI files shown below in
COM3D2\Sybaris\Unityinjector\Assets\resources. After you delete the files, the UI will return to normal but not all content will be fully translated.
- AtlasColorPalette.png
- AtlasColorPalette2.png
- AtlasPreset.png
- AtlasProfile.png
- AtlasRandomPreset.png
- AtlasSceneEdit.png
- AtlasYotogi2.png
- AtlasSkillSelect.png
Gameplay
- Q1: How do I unlock the old personalities from CM3D2?
A: The main 3 personalities require CM3D2 and updating the game to the latest version in order to transfer the data into COM3D2. You can find more info here.
- Q2: How do I improve the club grade?
A: You need to finish the main story first, after that the club grade will be unlocked.
- Q3: How to unlock the new songs?
A: Same requirement as unlocking the club grade. You need to finish the main story of the game first before unlocking the new songs.
Installation Guide
More information can be found in the Custommaid Discord or the CustomMaid3D2 Community.
Installing the Game
- Set Windows system locale to Japanese or use NTLEA x64 or Locale Emulator
Note: If you are a new player, please read more info at Q1. - When you extract the files you will get two .iso files.
-
カスタムオーダーメイド3D2 Disk 1 (iso+mds+rr3).rar➡com3d2_1.iso -
カスタムオーダーメイド3D2 Disk 2 (iso+mds+rr3).rar➡com3d2_2.iso
-
- Mount
com3d2_1.isowith Daemontools Lite if you use Windows 10 you can directly mount the files by right-clicking the .iso and choosemount
Note: If you have trouble using other mounting software, Daemontools Lite has been confirmed to work. - If the installer does not autorun, go to My Computer or This PC and open the mounted dvd and then run
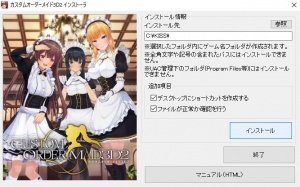
Installer.exeif your computer locale is already set to japanese. If not then right-clickInstaller.exeand selectRun with Japanese locale as an administrator(you need NTLEA x64 or Locale Emulator for the right-click options). - Select the installation folder (default is C:\KISS).
Caution: Do not use double-byte characters or symbols on the folder name
(example: ✓ C:\KISS\COM3D2 | ✕ C:\キス\COM3D2). - Click the
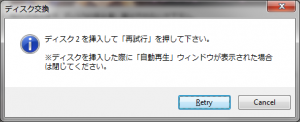
インストールbutton to start the COM3D2 setup. After that wait until the setup asks for disk 2. - Unmount
com3d2_1.isoand mountcom3d2_2.isoand then clickRetry. - Wait for the setup to finish and close the installer.
Updating the game
- Set Windows system locale to japanese or use NTLEA x64 or Locale Emulator
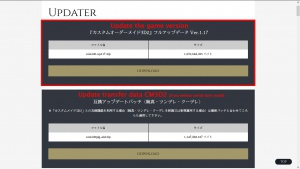
Note: If you are a new player, please read more info at Q1. - Download the latest update from Official Update
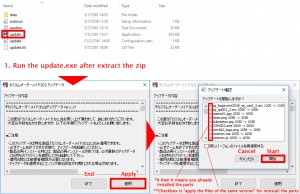
- Extract the zip file and run
update.exeinside the extracted folder. If your Windows locale is set to japanese then it will auto-detect your installation directory.
If not then right-clickupdate.exeand selectRun with Japanese locale as an administrator(you need NTLEA x64 or Locale Emulator for the right-click options). - Choose
適用->開始 - Wait for the patch to finish installing and close the updater.
Note: Installing DLC and append follows the same steps as updating the game.
Installing Sybaris2
Sybaris2 FAQ
- Q1: What is Sybaris2?
- A: Sybaris2 is an updated version of sybaris, which can be used to load and run plugins other than the official plugins that are included in the base game.
- Q2: Why use Sybaris2?
- A: Sybaris2 has many plugins that are very useful for players who play COM3D2, it also has the following advantages:
- It does not affect the base game, you can go back to vanilla anytime.
- Updating the game causes less problems.
- Q3: Does Sybaris2 have disadvantages?
- A: Sybaris2 has the following disadvantages:
- Sybaris2 no longer uses a gamedata folder, that means sybaris2 can't load mods manually.
- Some sybaris plugins are incompatible with sybaris2, such as VibeYourMaid plugin.
- Q4: How many Sybaris2 plugins are supported?
- A: You can check motimoti3d
Sybaris2
For an easy installation you can download: Sybaris2 AIO for COM3D2 v1.16
This Package contains:
- Sybaris2 support v1.16
- Plugins
- Translations
- Uncensor
1. Download Sybaris2 AIO Pack and extract the zip
2. Copy opengl32.dll and Sybaris folder and place them into the game folder
-
opengl32.dll➡C:\KISS\COM3D2 -
Sybaris➡C:\KISS\COM3D2
Note: If you use the Sybaris2 AIO Pack, then you are done and ready to play the game. If you install only sybaris2 then you still need to manually install the plugins. You can find the manual installation steps here.
Transfering Data
In order to transfer the data from CM3D2 to COM3D2, you must to do the following. (example: personalities, characters, DLC, etc.)
- Both CM3D2 and COM3D2 have been installed correctly on Windows. (note: The game will check the registry on Windows)
- CM3D2 must be updated to ver1.58.1 or higher.
- COM3D2 must be updated to ver1.02 or higher.
- Install the 互換アップデートパッチ update from Official Update.
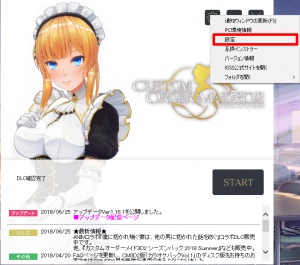
- After correctly installing the update above, open the COM3D2 launcher and select
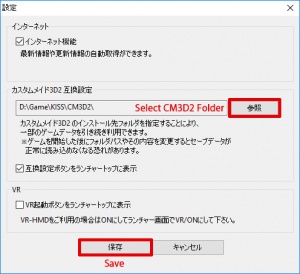
互換設定orGear Icon>設定. - Then go to the compatibility settings (カスタムメイド3D2 互換設定) and choose the directory where CM3D2 is installed. After you are done press
保存to save your settings.
Installing Mods
In order to nstall mods, you can follow the steps below.
For Vanilla
1. Go to the game folder and create a new folder called "Mod" (example: C:\KISS\COM3D2\Mod)
2. Put the mod files into COM3D2\Mod folder.
For Sybaris2
1. You need to install Modloader Plugin for sybaris2.
2. After installing the plugin, put the mod files into the COM3D2\Mod folder.
Note1: .mod files should be placed without the folder.
Note2: For body mods, you should have the BodyCategoryAdd Plugin in sybaris2 before it will appear in maid edit. (example: Body kupa, TKbody)
