Difference between revisions of "Premium Play Darkness/Modding"
| Line 52: | Line 52: | ||
'''The 3rd and 4th number.'''<br />In our example, the code showed "0 0" as the third and fourth reference.''' This means that the costume has NO bra NOR pantie!'''<br />'''''1 0''' would mean bra + no pantie, and<br />'''0 1''' would mean no bra, but with pantie.'' | '''The 3rd and 4th number.'''<br />In our example, the code showed "0 0" as the third and fourth reference.''' This means that the costume has NO bra NOR pantie!'''<br />'''''1 0''' would mean bra + no pantie, and<br />'''0 1''' would mean no bra, but with pantie.'' | ||
| + | |||
| + | --------------------------------------------------------------------------------------------------------------------------------------------------------------------- | ||
| + | |||
| + | '''What files to include into your own costume mod?''' | ||
| + | |||
| + | Down below you can see what files that you need to include into your own costume mod. Take note of that this particular suit will not be able to display semen on it or the character in '''dressed''' or '''half dressed''' mode. | ||
| + | |||
| + | [[File:Folderitem.png|thumb|left|400px]] | ||
| + | |||
| + | |||
| + | |||
| + | |||
| + | |||
| + | |||
| + | |||
| + | |||
| + | |||
| + | |||
| + | |||
| + | |||
| + | |||
| + | |||
| + | |||
| + | |||
| + | |||
| + | To be able to do display semen(siru), include these files in your package: | ||
| + | |||
| + | [[File:Siru.png|thumb|left|400px]] | ||
Revision as of 05:29, 22 June 2013
How to install mod
1. Most modders includes a readme which contains information on how to install their mod.
2. Costume mods may at most require to be dropped into PPD and/or PSP data folders.
3.Custom Studio Objects requires altering of StudioItemList.lst in either prpr_10_00.pp or prpr_20_00.pp, depending on which version of the game you got, if you got both; StudioItemList.lst prpr_20_00.pp is where you should add your custom studio items.
The modder is most likely to including the snip of text that you'd have to add to the list.
4. Installing Custom Characters
(updating later unless someone gets to it before me.)
Custom Costume Modding - Packing it right!
(Most of the text is from a post made by bdpq, it have been altered a bit.)
This is a basic .pp costume packaging guide. If you are a costume modder, or if you want to be a costume modder, this post maybe of interest to you.
Proper numbering
One of the most common errors encountered by PPD costume modders is the undocumented limit in costume numbers. Your costume must be numbered within 0 to 254. However, 0 -100 are mostly occupied by Illusion official costumes, so I would recommend you find a number that, to your best knowledge, has not been used by other custom costumes. This is difficult, however, unless we have an costume manager application, this is just the way it has to be for now.
If you exceed the 254 number, your character will show different costumes when switching between the fully-clothed and semi-nude state.
Correct Reference to the .pp and .xx file
Your .pp file, must be correctly referenced in the ched*.lst file within your .pp package. There is currently no commonly-agreed naming convention for custom costumes, however I would recommend you start with the prpr_99_* naming standard. This way your custom costume will always show up near the end. In other words, if you name your .pp file something such as 100.pp, your costume will be ordered at the top.
If you changed the .pp name without changing the reference in the ched*.lst file. your costume window will only show a darkened head floating in midair. Then your game will crash.
ex1: 169 costumename NULL NULL cw_body_123_00.xx data/prpr_filenamehere.pp 0 0 0 0
Correct lst syntax, referencing and formatting
the ched*.lst contains important referencing information for your costume. the name of the costume, the filehname for the .xx file, and the reference to the .pp file are all here. The space in the lst might looked like space to you, but they are actually tabs. turn on the "visualize space" function in your text editor, you should see several ">>" symbols. They are the tabs. If you change them to spaces, your costume will always crash.
Dealing with bra and Panties
The reference to the underwear of choice is ALSO in the ched*.lst file!! if you are encountering issue such as your character is showing different underwear in the semi-nude and fully-nude state, you most likely have this problem.
In a typical ched*.lst file, you should see something like this:
//        File    Pack    File    Pack    kind    index
1001    costumename    NULL    NULL    cw_body_111_00.xx    data/prpr_99_111_costume_name.pp    1    1    0    0
The 1 1 0 0 at the end is the important part for bra and pantie assignment.
The first two numbers
Take a look at your *01.xx file, and look for the texture on the bra. let's assume the texture name for the bra is cw_t_bura_01_01.tga
that's what the first two "1"s are for. If you wanted something like the school girl blue strip bra, then you have to:
1. change the texture in your *01.xx file to cw_t_bura_00_00.tga, and
2. change the reference to the underwear in the ched file to 0 0 * * (more on the 3rd and 4th number later)
The 3rd and 4th number.
In our example, the code showed "0 0" as the third and fourth reference. This means that the costume has NO bra NOR pantie!
1 0 would mean bra + no pantie, and
0 1 would mean no bra, but with pantie.
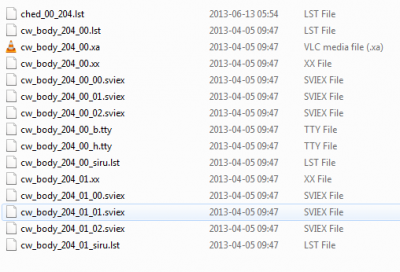
What files to include into your own costume mod?
Down below you can see what files that you need to include into your own costume mod. Take note of that this particular suit will not be able to display semen on it or the character in dressed or half dressed mode.
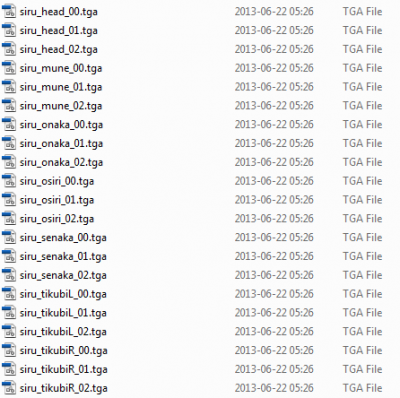
To be able to do display semen(siru), include these files in your package:

